DIY rainbow hair

Let’s talk hair for a moment. In the last 13 years of my life, I have worn almost every shade from cotton candy pink to dark blue. Everything except red, I think.

And I have always dyed my own hair (often with the help of various friends) for a number of reasons, so I am asked rainbow-hair-related questions a lot. Because of all this, I have been meaning to write a post about this whole business forever. So here we go: This is the DIY guide to rainbow hair :)

Okay … My hair was way longer back then.

When I’m talking about hair dye, I am talking about rainbow hair – “rainbow hair” refers to unnatural/neon colors in general, not necessarily to an actual rainbow. And it usually implies semi-permanent dye products such as Special Effects, Manic Panic, or Directions brands (As really bright colors are not available as permanent dyes). So now that we have established what we are talking about, I will tell you what I am usually doing to my – and sometimes my friends’ – hair.

Please bear in mind that this series is not so much a tutorial on how to dye hair, but rather a collection of all the things I learned about dyeing hair with semi-permanent colors. I tried to answer all the questions I have been asked by people who never spent a second thought on their hair care routines. I did my best to write down everything that’s usually not part of the tutorials flying around on the internet I wish I had known ten years ago. Apparently that’s quite a lot …

The 6 individual hair dye tutorial posts:

But let’s discuss a few basic things first.

I love colors, but I’m also quite determined to be able to pass as an adult when I need to, so this generally is the direction my hair adventures are leading these days. When I was an actual teenager, I donned fuzzy neon-rainbow non-hair-styles quite often, and I think that by now I am done with this phase.

Having rainbow hair is great, but looking like a mop is really not what I want anymore. As I’m more of an all-or-nothing kind of person (As in … Everything that is worth doing in the first place, is it worth doing well) this generally means that I will bleach the roots and touch up on the color at least every four weeks, and just try to keep it in a reasonable state.

For hair that is getting the treatment mine does, that mostly means not looking like a bundle of straw a unicorn had puked on. If that’s what you’re going for that’s fine though. It actually sounds like it would work as an ironic twist on the current unicorn hype, and also like someone should hurry and add some glitter … but I digress.

The Downside

It’s worth mentioning that constantly keeping one’s hair a proper neon shade is somewhat annoying, so I thought I’d let you know before we start all of this. You absolutely do not have to bleach and dye your hair monthly, your requirements for that also depend a lot on your personal preferences and hair care routines, style, and potential dress codes for a school or job.

In the end it’s your body, you’re an adult, so do whatever you want (and can get away with). I do have a job and things like that and I have found having rainbow hair is not a big problem really – as long as it’s well maintained. I guess this is one of the privileges of working in a creative field, but so far people could not care less if the head sticking out of my suit came with blue, pink, or purple hair.

Disclaimer: I am not a professional and everything I have to say about hair (dye) comes from my personal experience. At the time of writing this post, I’ve been sporting neon hair for almost 13 years. This means that at this point I know what works for me and my hair very well, and I also know how to destroy it beyond repair. *sigh*

But please be aware even though I have plenty experience now, and I’ve helped many others do their hair throughout the years, your experience might vastly differ from mine. If you follow my instructions, you do so at your own risk.

Language As about half the people asking me about hair tips don’t speak German, I decided to write this post in English. If you feel it should be available in German as well, and you want to translate it, shoot me a message.

Bleaching – The Basics

I will guide you through the whole process of getting rainbow hair, but please have a look at the whole series of posts before actually getting started on your hair. The posts are organized by topic rather than true step by step instructions. But first things first:

Do I need to bleach my hair?

There is not an right answer to this question, but probably yes.

If you have really light hair, maybe you can get to your desired color without bleaching first. The darker your desired color is, the more likely you are to get away without bleaching. It is impossible to get to a really bright color if you are not starting with white/bleached hair. Bleaching will almost always make your hair take in dye pigments much better, which means brighter colors that last longer. But as always, I think the easiest way to find out is to test it on a strand.

Bleaching, the Basics

I’m mostly shopping for my hair stuff at ROMA, a chain selling professional grade hair supplies. I’ve always been living close enough to one of their stores, so I have been buying their bleaching products since I started the whole rainbow hair thing.

My hair before bleaching.

And after.

A word of warning: I have bleached hair in the United States once, and how they label bleach volumes there seems to be different from Europe. Not sure why or how (It’s been a while), but they were labeled differently. So if you’re not in Austria (like I am) please be aware that there can be regional differences in how the products are marketed/labelled – So read the instructions of the products you actually want to use first.

This is not to say that bleaching your hair is dangerous or something you need to be afraid of. Just be aware that it is damaging your hair, no matter how gentle your or your helpers or hairdresser are. Bleaching, in the end, is the process of intentionally destroying your natural hair structure.

Bleaching, the Process.

I’m using a two-part product, consisting of hydrogen peroxide (A liquid that is about the consistency of shampoo) and bleaching powder. The peroxide is available in different strengths, or volumes, and the bleaching powder is the same for all of them. Where I shop you get the peroxide in 6%, 9%, and 12% volumes.
When mixed together, the chemicals start reacting: This reaction is what bleaches your hair. The reaction stops at some point, so if you take more than half an hour from combining your chemicals to finish applying the mixture to your hair the reaction time might become a problem. If you think you need more time, just work in batches and take your time.

The first factor to consider is your hair color: Mine is a dark blonde, so I use 6% peroxide for myself. This is the weakest peroxide option one can buy here. For darker hair you need stronger volumes, and you also need to be more careful about damaging your hair and skin.

This is a friend’s hair before bleaching, his hair is almost black.

And after – he uses 12% bleach and his scalp is not particularly happy about that.

If you are not sure about the right product, I would suggest doing a test run. Take a strand of hair and try the bleach on it to see what it does, and if you’re happy with the outcome. Seriously. If you’re bleaching your hair for the first time it’s safer to waste an hour or two on a test run than to potentially fry all your hair. Be aware that a higher volume bleach also means it is more irritating to your skin, so if you have sensitive skin you might want to consider that as well.

You want to use the least aggressive product that gets the job done – and that depends on three factors: The first one is the hair color you’re starting from. The lighter your hair is, the easier it will be. Really dark hair, or hair that already is permanently dyed is harder to bleach.

The second factor is the hair color you want to reach. When bleaching your hair, it will first go orange, then yellow, and then eventually it will become white (actually, it will rather be a really light shade of yellow). If you want to dye your hair hot pink, red, orange or some other color that already has a lot of yellow in it, don’t worry about getting your hair white. For my regular pink and purple shades, I usually don’t bother and just bleach to bright yellow. This is also true for most shades of green, as green is made by mixing blue and yellow, so starting with yellow hair is fine (orange is a problem). If you want light grey or lavender tones, or anything blue, you want to get your hair as white as possible. If you want to go bright orange, on the other hand, you can start from an orange shade just as well.

And third is the structure of your hair. Regardless of the hair color you are starting with, thick, coarse hair is usually a bit harder to bleach – especially if you have a lot of hair.

Just don’t rush it when bleaching your hair for the first time. Take your time to figure out what works for you. Write down what works best, so you remember for the next time.

Schweigen

Nachdem der erste Sticker so gut ankommt, ist direkt ein zweiter entstanden.

Der aktuelle politische Diskurs ist unglaublich laut, und gleichzeitig werden viele immer stiller.
Im Sinne der Metakommunikativen Axiome nach Paul Watzlawick et al.: Man kann nicht nicht kommunizieren.

Es ist Zeit darüber nachzudenken, was wir mit unserer Stimme eigentlich bewirken – oder eben nicht. Und ob was wir tun auch wirklich in unserem Sinne ist.

Sticker #2

Sticker mit Orange und Violettem Hintergrund und weißem Text

Macht was Schönes damit falls ihr mögt, und wenn ihr euch wegen der Lizenz unsicher seid könnt ihr mich auch gerne kontaktieren.

Haselnusspunsch und Monster

Hazelnut! Winter! Punch! My favorite winter punch stall sells Haselnusspunsch.

And it’s the best. Really.

I’ve been meaning to make my own for years now, but somehow I never got my hands on anything reasonable for the hazelnut flavoring. Haha! Until now. I found hazelnut syrup in Vienna’s fancy first district Merkur a few weeks back and of course I set out to recreate my favorite punch. Alcohol free.

Hazelnuts aside, it is really hard to find special and interesting wintery drinks without alcohol. More generally, it is way too hard to avoid alcohol. I’m constantly irritated by how much alcohol is being consumed as a basic building block for social interactions … But I digress. I’m not in the mood to discuss politics and social protocols, so let’s make punch instead.

And before anyone complains about the lack of booze: The best thing about this recipe is that it goes both ways. The basic recipe is kid people-who-don’t-drink friendly, but it can be adapted to be “regular” punch with rum.

Haselnusspunsch
with and without alcohol
You need
1.5L water
0.5l apple juice
2 oranges (the juice)
2 lemons (the juice)
5 bags Winterzauber tea
1-2 cinnamon sticks
15 cloves
120ml Monin hazelnut syrup
Optional
100ml Rum (or to taste)


In a big pot, bring the water and apple juice to a boil.

Meanwhile, juice the lemons and oranges.

Add the spices, fruit juices and tea bags to the pot. Let the mixture simmer for 10 to 15 minutes.

Remove the pot from the heat (or the lowest setting if you are planning on keeping it warm during a party) and add the hazelnut syrup.

If you want to add rum, you can do that now. If you only wanted alcoholic hazelnut punch to begin with, you could just as well use clear hazelnut liqueur to replace the syrup (and probably omit the rum).

Serve hot and enjoy!

Note

I use a tea blend called “Winterzauber” that’s readily available in Austria. If you can’t get that, you can substitute it with other wintery fruit teas.

And because that tea blend is quite specific, I looked up the ingredients for Winterzauber tea so you can find a good substitute. The following list is ordered by weight. I hope that helps, but I’m sure future me will be happy about having done that the next time I want to make punch while not in Austria ;)

Ingredients: hibiscus, rose hip, cinnamon, Spekulatius flavoring, apples, orange peel, elderberries, cloves, peppermint.

pumpkin ketchup recipe

This picture may or may not contain the pumpkin in question.

Sadly, when this project started, the strength of the onrushing tide was unknown, so there are no before-pictures of the pumpkin. Just like in the olden days before the internet was a thing and every phone had a camera. *gasp*

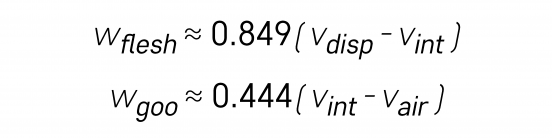
So, this all started with being gifted a huge garden pumpkin.

With that pumpkin came a desire to make ketchup. On the surface, this is a simple story of how pumpkin met vinegar and spicy things happened, but bubbling with undercurrents of how the planning stage really left us adrift and went on to devour a whole afternoon like a thing from the deep.

At the end of this post, you can find the recipe for both plain pumpkin ketchup and pumpkin curry ketchup. If you like ketchup and cooking, and you happen to have a pumpkin at hand, you should go make some.

But first a story about how most things are handled around here:
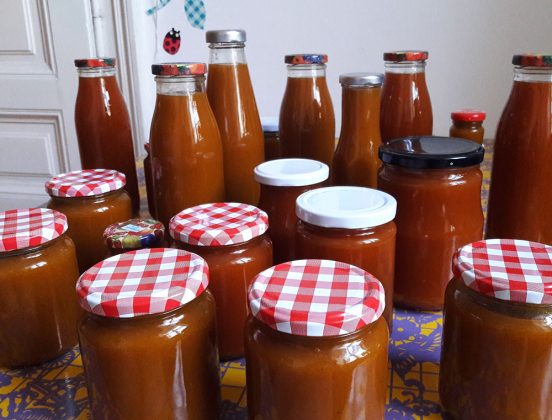
After.

Somewhere, there is a garden. The people owning the garden are nice people, so they deliver fresh produce to their offspring and other people they like. And that’s how we ended up with a monstrosity of a pumpkin sitting on our kitchen floor.

And of course we needed to know how much usable flesh it had to do anything with it, and that is determined by monster-pumpkin’s weight and size. It had already been decided that pumpkin ketchup was wanted, so knowing how much output there would be, and precisely how much vinegar to shop for suddenly became a major concern of everyone involved – which at this point had begun to include everyone in the apartment.

That led us to doing the only reasonable thing: we put the pumpkin on the kitchen scale (or tried to): The pumpkin was so big that it obscured the display of the scale. When we did manage to read it we got an error because it was so heavy.

What any sensible, normal home preserver would do at this point is just cut up the pumpkin and weigh the flesh in batches. However, we started our pumpkin ketchup planning at the very reasonable time of midnight, and didn’t really want to actually chop and store (or cook) a whole pumpkin right then and there.

This left us a handful of possibilities, starting from unreasonable and ending up at downright silly. We jumped right in: being a household of sewists, the obvious first action was to take the pumpkins’ measurements and calculate its volume.

The more visually inclined residents estimated that the pumpkin was fairly close to an ellipsoid in shape, and to calculate its volume that way requires only three measurements – the radial lengths in each of its dimensions (that is the distance from the middle of the pumpkin to the outer edges).

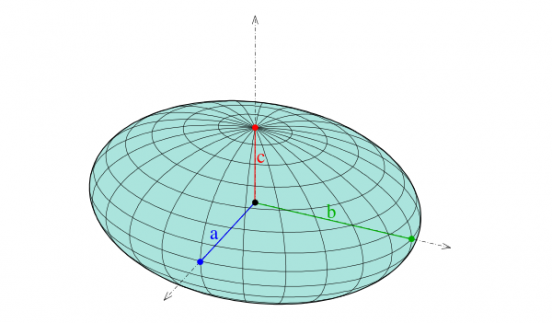
Ellipsoid with axes labeled, © ag2gaeh

The measurements needed are the lengths of the labels a,b and c. One can then find the volume of the ellipsoid by putting those values into the formula:

The volume of an ellipsoid.

After extensively measuring the pumpkin in all three of its dimensions*, it was decided that

  • a = 16.5 cm
  • b = 14.5 cm
  • c is between 7.5 and 8 cm

As it turns out measuring a pumpkin accurately with a tape measure is more difficult than it looks. It takes some guesswork expertise to deal with all the bumps and ridges, and also to calculate the volume of the hole in the middle of the pumpkin.

This gave us a range of volumes for the entire pumpkin using the formula above. It came out between 7.516L and 8.018L.

To turn a volume measurement into a weight measurement involves knowing the density of whatever it is you’re measuring. So we did a quick search on the internet and it was suggested that pumpkin has roughly the density of water. Since a litre of water weighs one kilogram** we were done by changing the litres to kilograms on our values above.

Now we could move onto much more important things like finding a recipe to adapt and crib from. Or starting our shopping list*** with an appropriate amount of vinegar and other spices (for making curry ketchup, which was something that everyone agreed would be by far the best thing on fries), right?

By this point we were curious about this pumpkin and decided to figure out if the pumpkin flesh really has the density of water, and if estimates for the weight obtained by measuring and guessing and modelling with shapes were accurate, too (read: it was a matter of pride, by this time. And stubbornness. Mostly stubbornness.). So being scientists and nerds, we put the pumpkin aside with the plan to do some more basic science to see if the measurements were close and if we could figure more out about it****.

In the morning, we started by finding the biggest bucket we could, but we already knew we had a problem as the pumpkin wasn’t exactly small. We eventually settled on dropping the pumpkin into a laundry basket containing about 20L of water.

By estimating the volume of the pumpkin more closely and seeing how much water it displaced, we worked out an estimate for the density of the pumpkin flesh. In all of this, for the science-y minded people, we were invoking Archimedes’ principle, which boils down here to saying that the weight of the pumpkin is equal to the density of the pumpkin multiplied by the volume of water it displaces. Applying this would let us roughly figure out how much future pumpkins would weigh based on only their volume.

Note that by this point, with the pumpkin floating in a laundry bucket of cold water, we were way past what would be reasonable just to preserve the pumpkin to eat — instead we decided to immortalize it, and understand literally everything we could about its composition, because doing science in addition to cooking just felt completely necessary here.

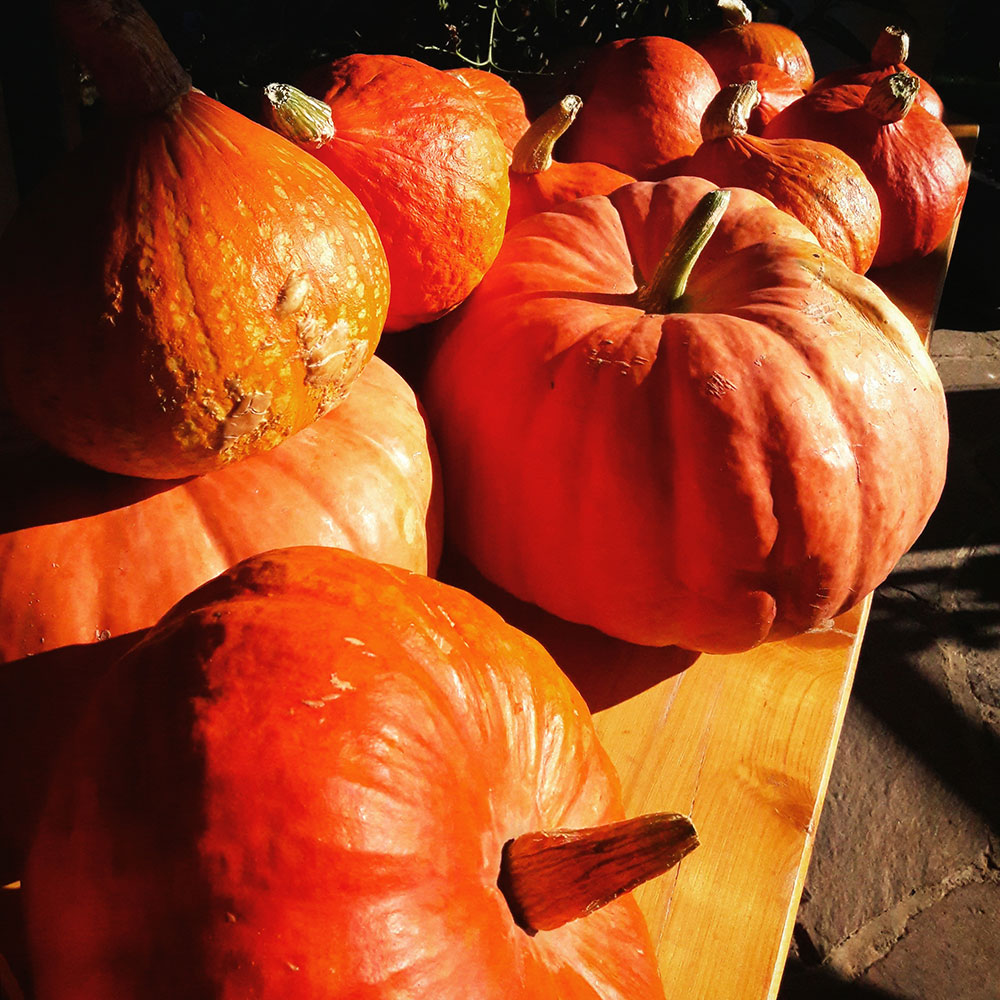
All that in mind, we submerged the pumpkin before we cut it up. This was a lot of effort, and it felt like trying to drown a brick-like sponge. After wrestling with it for a while we found that it displaced 12.5L of water.

Floating pumpkin.

Note that it’s floating. Using this clue and our Holmesian powers of abduction we remembered that pumpkins have a large hole of seeds and air in the centre, which lowers the average density so much that it floats. Thus, to figure out specifically how dense the flesh is relative to water we had to give in and sink it.

We cut the pumpkin in half and filled up each half. We found that the total amount of water we could pour inside was 2.75L with the seeds inside, and 4.71L without the seeds – thus the seeds had a volume of 4.71L-2.75L = 1.96L.

Subtracting this volume of water from the water displaced we get the total volume of displaced water for the flesh alone: 7.79L. This showed us that with all this extra work, that the professionally measured volume (read: tape measure supported guess) was actually close for the flesh volume. If we were to do it again, only measuring the volume would entirely reasonable.

Note that if we stopped here and just assumed that water and pumpkin flesh had the same density, we would have obtained a weight estimate of 7.79kg.

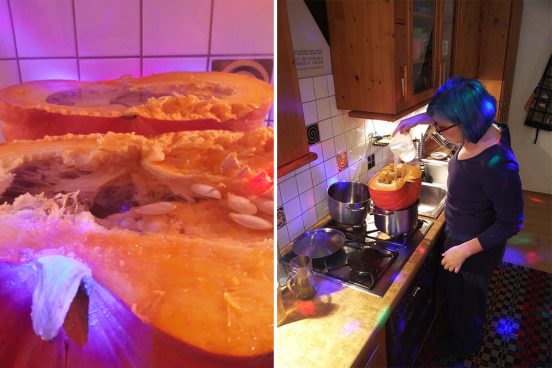
Yes. Our kitchen is, in fact, lit by a disco bulb.

We then cut up and weighed the flesh on the kitchen scale. Each half was close in weight and the total weight of the pumpkin flesh was 6.616kg. We also weighed the gooey seeds, which came to 865g — so the total weight of everything was 7.481kg.

This means our estimates assuming that the density of pumpkin flesh is the same as the density of water were only out by somewhere in the range of 35 to 537 grams. However, the fact that the weight of the flesh is quite different from the volume measurements tells us that the density assumption isn’t really a valid one in the first place.

It’s also important when doing complex measurements this way to keep track of everything on a large piece of scrap paper – we chose a handily oversized engineers pizza box from dinner the night before for this job.

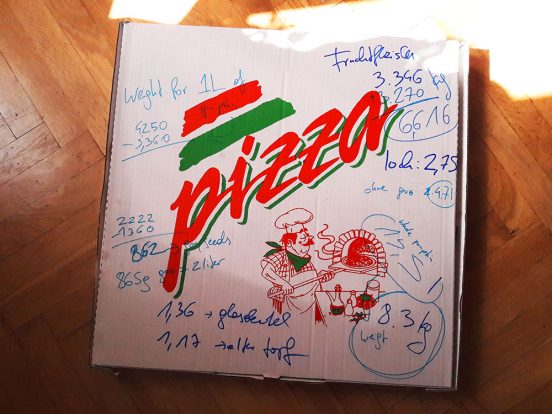
Our lovely pizza box. It’s family pizza sized.

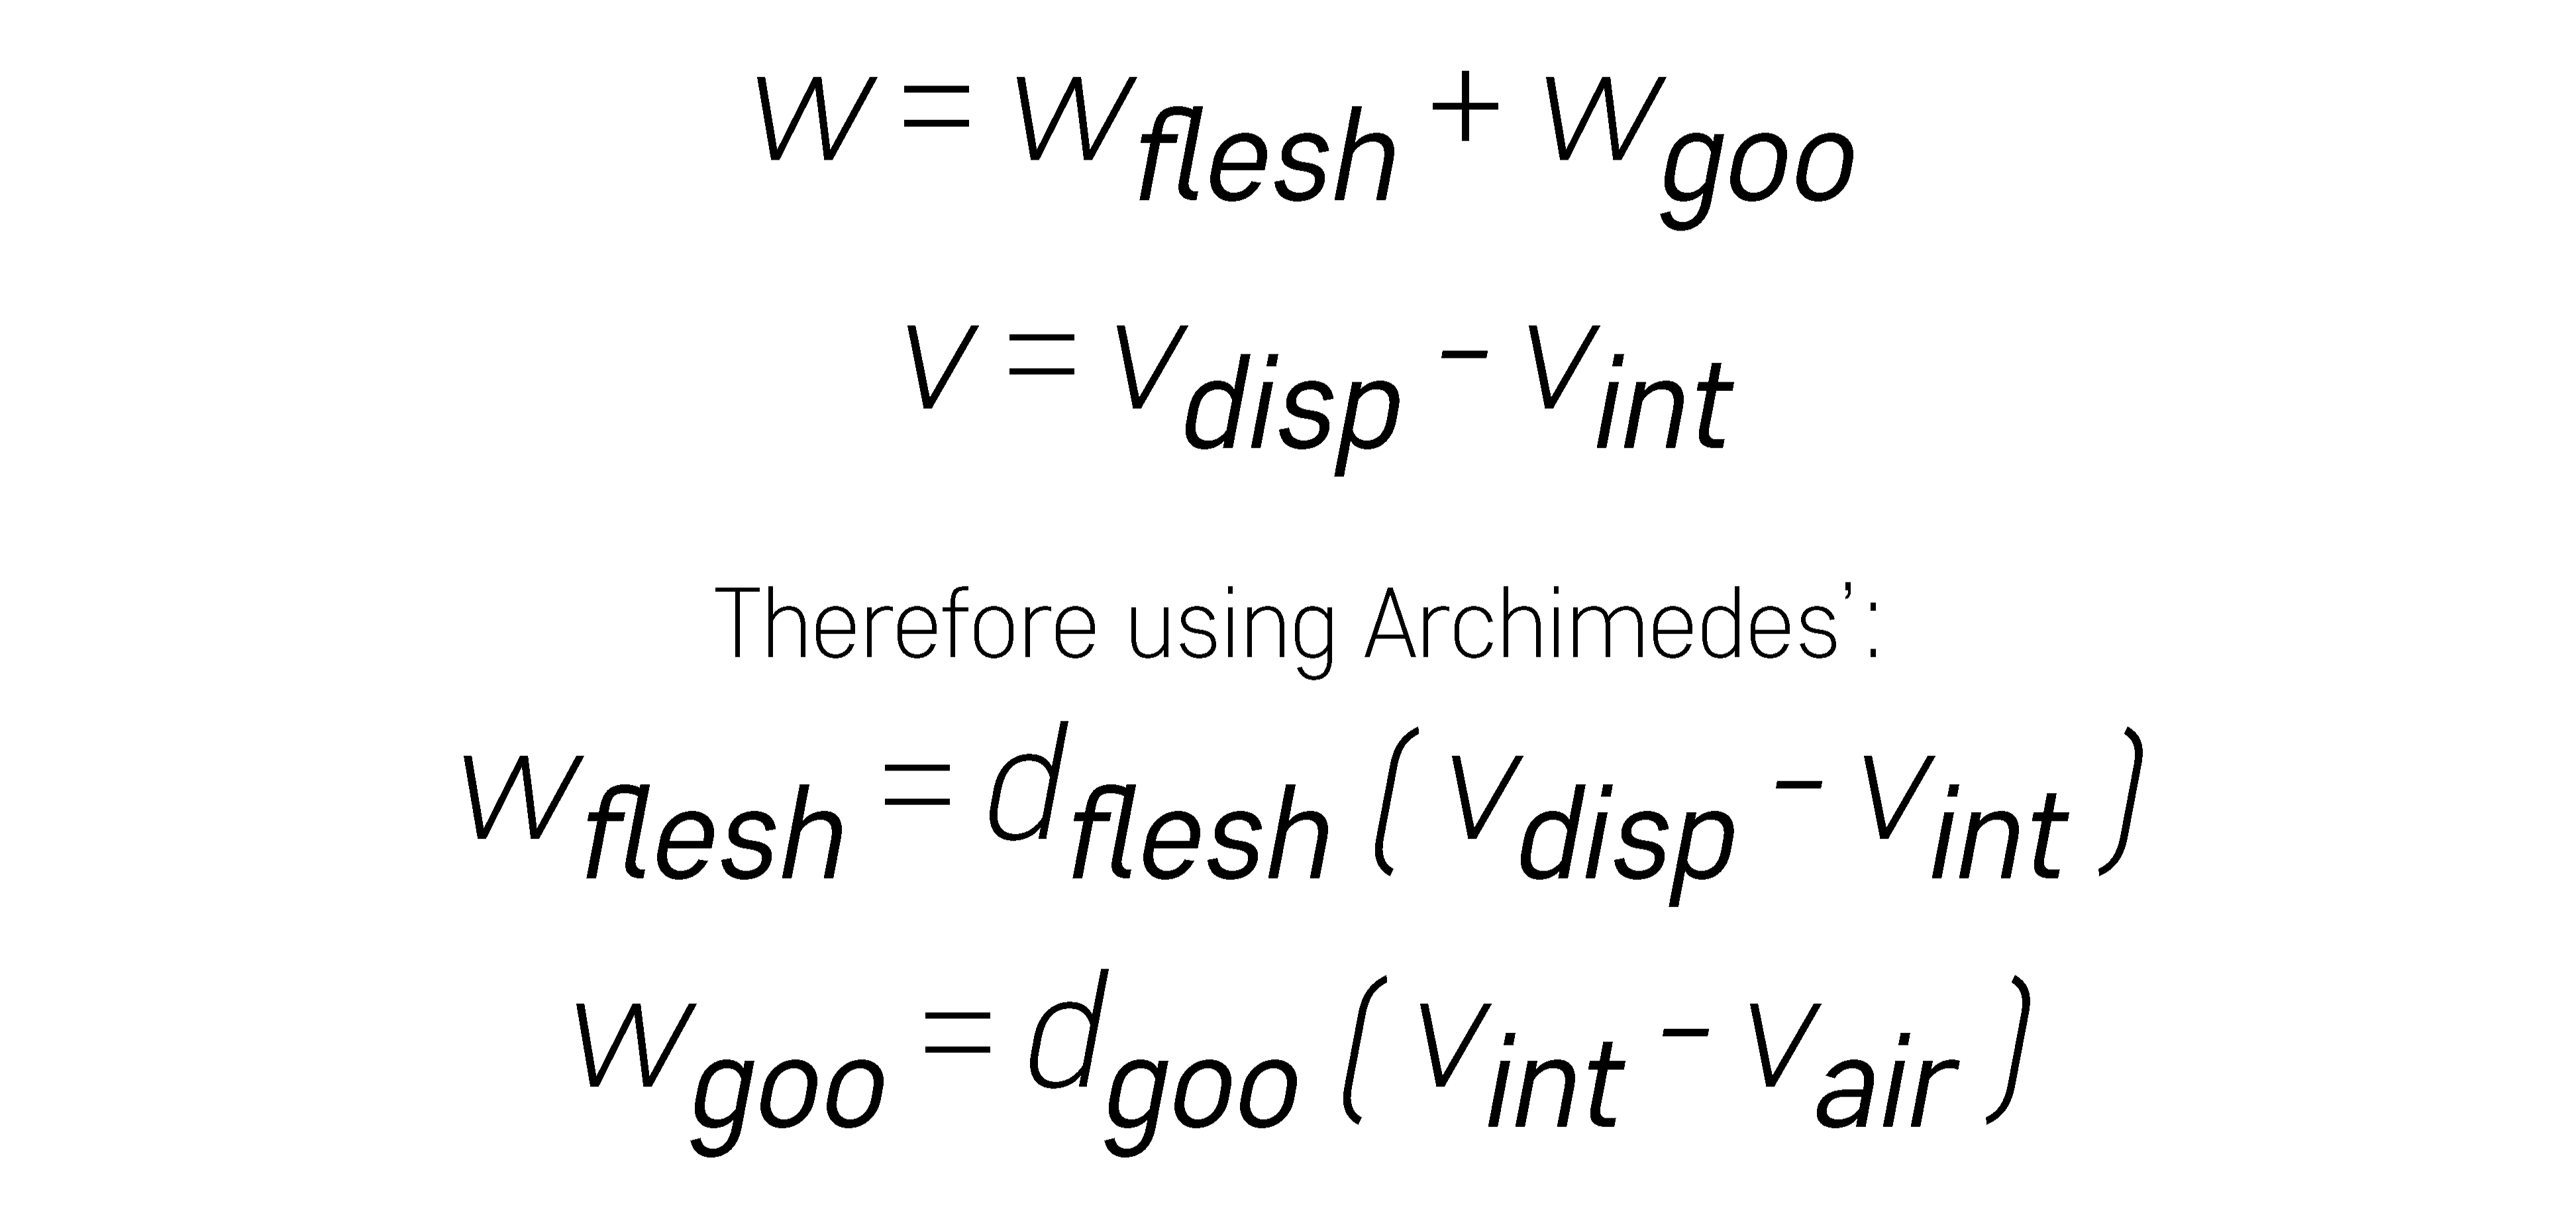
And armed with that weights of the flesh and goo, we proceeded to figure out their densities by Archimedes’ principle. The density of pumpkin is 6.616kg/7.79L, which is approximately 0.849kg/L, and the density of the goo is 0.865kg/1.96L, which is approximately 0.444kg/L. All this came from the formulae:

Equations for relating the density and the volume to the weight.

  • where here w is the weight of the pumpkin
  • w(flesh) is the weight of the pumpkin flesh (here 6.616kg)
  • w(goo) is the weight of the pumpkin seeds and goo (here 0.865kg)
  • v is the volume of the pumpkin
  • v(disp) is the amount of water it displaces in a container (here 12.5L)
  • v(int) is the internal volume of the pumpkin, i.e the volume inside the pumpkin without the seeds (here 4.71L)
  • v(air) is the internal volume of the pumpkin with the seeds left inside (here 2.75L, this is obtained by putting water inside the pumpkin BEFORE scooping out the seeds)

To recap, from this we found that d(flesh), the density of the flesh, is approximately 0.849 kg/L and d(goo), the density of the goo, is approximately 0.444 kg/L. From this calculation we can see the density of the flesh differs from that of water.

This can also be used to estimate the weight of either flesh or goo for a generic pumpkin (or estimate it) simply by knowing the overall volume, i.e the volume displaced in a bucket minus the volume of the insides without the seeds (or the difference between the internal volume and the volume with the seeds in, as above.). The following handy formulae work for that:

Density for the various pumpkin parts.

This won’t give perfectly accurate results for any other pumpkin, as they’re specific to this one specimen. But it will give a rough estimate*****.

After a few extra hours we had an almost comprehensive understanding of the pumpkin: how it looked, was shaped, its weight and how dense its goo was. From all that it turns out just measuring everything will give you a good idea of how the recipes below scale. However, if you’ve got some free time and like playing with your food, then you could probably squash all of this into an afternoon.

Recipe

The point of this whole post is sharing the pumpkin ketchup recipes, so here is what we came up with. It works great for winter gifts that are more interesting than chutney or jam. Or just eat all of it yourself … I really love the curry ketchup on fries, with obscene amounts of mayonnaise.

These are the scaled recipes, each starting from a base of 1kg of pumpkin, and they require jars or bottles to seal the ketchup in once its complete.

Pumpkin Ketchup
Plain Pumpkin Ketchup
and a Curry Variation
Plain Ketchup
1kg pumpkin (prepared)
350ml apple cider vinegar
1/2 tsp salt
1/2 tsp pepper
1/2 tsp citric acid powder
1 pinch caraway(kümmel) (or to taste)
1 pinch cumin (kreuzk.) (or to taste)
65g tomato puree
450g jam sugar
Curry Ketchup
1kg pumpkin (prepared)
400ml apple cider vinegar
80g onion
1/2 tsp salt
1/4 tsp pepper
1/2 tsp citric acid powder
10g curry powder
15g tomato puree
450g 2:1 jam sugar


Note that this is one recipe for both the curry ketchup and the plain one. You can pick either one and just follow the respective recipe – or make both! The recipe is perfect for experiments, too.

You can experiment with the amount of vinegar and spices, adapting the recipe to your own preferences. And sometimes the ingredients can make a huge difference too: We made the curry ketchup again after a while, using a different sort of pumpkin and a new brand of curry powder and needed almost twice as much curry to get a similar taste.

Peel, deseed and coarsely chop the pumpkin, and dice the onion. This step really only takes 15 minutes and not the 3 hours suggested by the first part of the story.

Place the pumpkin flesh in a large pot and add half the vinegar and onion (if used). Cook everything on medium heat until it‘s soft and mushy, then puree the mixture until you‘ve reached a consistency you like for your ketchup. You want to loose as much water as you can at this stage, so cook it with an open lid.

Add the spices, tomato puree and the rest of the vinegar (You might want to adjust the amount of vinegar in this step) and cook for 30 minutes or until mixture has reached a ketchup-like consistency. Your pumpkin might need to loose considerable amounts of water: We ended up with roughly one liter of pumpkin ketchup per kilo of pumpkin in the recipe. Be careful: The mixture burns easily, and the bubbling sugary pumpkin mush is really really hot. We found it easiest to bring it to a temperature where the mixture is not yet simmering, just steaming. Then we just kept stirring it occasionally until it was thick enough.

Add the jam sugar (Gelierzucker) and boil for 5-10 minutes or according to the directions on the package. Again, be careful because it will do it’s best to burn to the bottom of the pan.

Transfer into sterilized jars or bottles, sealing them quickly as you go.

Note

The measurements in the recipe are what worked for me.

I always prefer adding the vinegar in stages – and tasting
the mixture between additions to make sure it tastes good.

The End.

You know what the best part is?

After floating the pumpkin and calculating its density, we went on to actually cook the ketchup. Only to find we were not equipped to deal with such volumes of pumpkin flesh****** as we only had enough pots to make 6L of ketchup …

Footnotes *******

* Taking time as a dimension though, this pumpkin is really really huge.

** It’s basically a conversion unit, though it does change if the temperature/pressure of the ambient space differs extremely from what is reasonable – another way to get to this is to take water as the basic mechanism for measuring density (which seemed reasonable to Archimedes) and so we would want to normalise to water, somehow.

*** We never did figure out how many bottles of vinegar to buy, so we just got 4L. If you have a quick look at the recipes, you can see that this turned out to be way to much.

**** At some point during this process (way after the measuring process went from purely practical to WHAT ELSE CAN WE LEARN ABOUT THIS PUMPKIN AND WHAT IS THE MOST INTERESTING WAY TO ACHIEVE IT???) we actually found a luggage scale and rigged a sling to get a weight. Our measurement of the weight using that scale was 8.3kg, which isn’t too far away from accurate – if you don’t want to get wet, don’t own a tape measure or just want ketchup).

***** If anyone else tries this process, please do send the numbers you obtain over. We can do a real study to get better estimates.

****** If a pumpkin is too big for average kitchen scales, chances are it’s too much for any given cooking project. Ahem.

******* Because all the best recipes require footnotes.

Heute so unpolitisch.

Heute ist so ein Tag.

Passend zum Tage, Monat und Jahr hab’ ich heute was für euch zum Ausdrucken, Sticker machen oder für T-Shirts:

Eine kleine Erinnerung

Sicker, weiße Pixelschrift auf schwarzem Grund mit den Worten

Macht was Schönes damit falls ihr mögt, und wenn ihr euch wegen der Lizenz unsicher seid könnt ihr mich auch gerne kontaktieren.

Und ein paar Worte

Ursprünglich eigentlich als Kommentar auf die Techbubble, deren Innovationen und Neutralitätsansprüche gedacht, passt das Zitat auch hier. Wie praktisch! Mir liegt viel Text ja nicht so, das können und machen andere besser. Daher hier nur eine Zusammenfassung in aller Kürze:

Alles ist politisch. Es ist schlicht eine Frage der Machtverhältnisse wer (oder was) durch Übereinkunft mit einer kulturell dominanten Meinung „neutral“ oder „unpolitisch“ durchgeht, sich nicht reflektieren und rechtfertigen muss.

In den (Geistes-)Wissenschaften herrscht schon länger Einigkeit darüber, dass es Neutralität in dem Sinne nicht gibt. Jede*r von uns hat eine Weltsicht die von dem was wir erfahren, gelernt, gedacht, gebraucht, gewollt und (nicht) bekommen haben geformt ist. Und das fließt in alles ein was wir tun. Wir alle sind politisch. Alles was wir tun ist politisch. Und wenn es gerade auf den ersten Blick nicht so aussieht, dann heißt das nur dass wir in der Privilegienlotterie zufällig das richtige Los gezogen haben.

Und nicht mehr als das.

Das heißt in weiterer Folge, dass nur Vielfalt vielfältiges schaffen kann. Und dazu müssen alle die eine Stimme bekommen, die nicht sowieso schon tausendfach gehört werden. Dazu müssen diejenigen, die von der Norm abweichen, sichtbar sein – sein dürfen. An sehr vielen Ecken und Enden überall werden aber gerade die laut, die sich von Vielfalt bedroht fühlen. Und sie kämpfen mit allem was sie haben dagegen.

In dem Sinne: Wenn ihr seht es läuft was schief und ihr irgendwie könnt, steht auf und tut was. Helft. Streitet. Seid ungemütlich. Seid sichtbar. Weil schweigen ist immer Zustimmung.

Lazy sunday (plus Kuchen)

rhubarb-pie

Rhubarb-Apple-Pie!

The weather was not at all appropriate for may (wet, cold, and generally disgusting), so today was spent cooking and baking. And fixing silly computer stuff.

Und das Rezept!

Nachdem ein paar Leute danach gefragt haben, hier das Rezept. Es ist nach einigem Herumexperimentieren und ein paar missglückten Versuchen irgendwann einfach so passiert.

Nachdem das Wetter leider absolut fürchterlich war gibt es dementsprechend auch nur fürchterliche Fotos. Jedes Mal wenn ich die Kamera rausholen wollte um bessere zu produzieren hat es geregnet, und irgendwann war dann kein Kuchen mehr da den irgendwer hätte fotografieren können …

Naja gut war er jedenfalls trotzdem, also macht euch mal schnell auch einen solange der Rhabarber noch Saison hat.

Das größte Problem für die Pieproduktion hier in Österreich ist ja leider eine dafür passende Kuchenform zu bekommen. Das Kuchenrezept ist auf eine traditionelle 9-inch-Pieform (23 cm) ausgelegt, die gibts hier aber nicht. Die roten Aluformen aus meinen Fotos hier funktionieren ganz gut eigentlich, wenn auch nicht ganz so wie ich das gerne hätte. Wenn ihr allerdings wisst wo ich hier in Österreich eine vernünftige Pieform herkriegen kann, dann nur her mit den Tipps.

Achtet jedenfalls darauf, dass die Form in der Größe mindestens fünf Zentimeter hoch ist. Und macht vor dem Backen Löcher in den Teigdeckel. Wirklich. Sonst geht das alles nämlich über. Und die klebrige Soße blubbert und spritzt und dreckt das ganze Backrohr voll. Also sagt nicht ich hätte euch nicht gewarnt :D

Ich hatte für den Kuchen außerdem knackige, rote Äpfel vom Markt und das war vermutlich die bestmögliche Ausgangssituation für eine leckere Füllung. Feste Äpfel machen die schönste Textur im Kuchen und Ich denke alle roten Sorten die nicht mehlig sind wären wahrscheinlich gut geeignet … Aber nun zum Rezept:

apple-rhubarb-pie

Hier gibts das PDF zum download.

rhubarb-pie-2