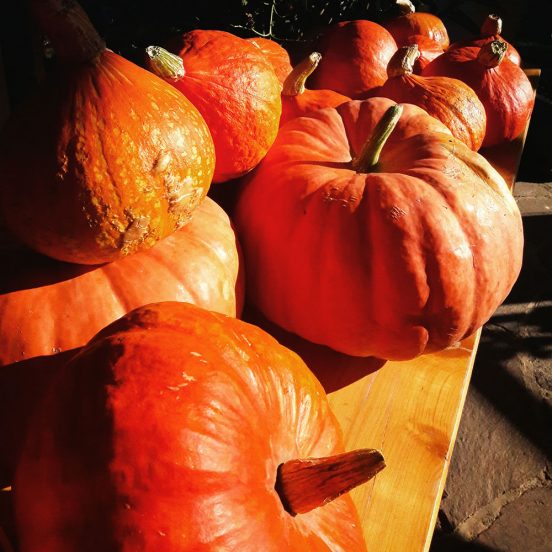
This picture may or may not contain the pumpkin in question.
Sadly, when this project started, the strength of the onrushing tide was unknown, so there are no before-pictures of the pumpkin. Just like in the olden days before the internet was a thing and every phone had a camera. *gasp*
So, this all started with being gifted a huge garden pumpkin.
With that pumpkin came a desire to make ketchup. On the surface, this is a simple story of how pumpkin met vinegar and spicy things happened, but bubbling with undercurrents of how the planning stage really left us adrift and went on to devour a whole afternoon like a thing from the deep.
At the end of this post, you can find the recipe for both plain pumpkin ketchup and pumpkin curry ketchup. If you like ketchup and cooking, and you happen to have a pumpkin at hand, you should go make some.
But first a story about how most things are handled around here:
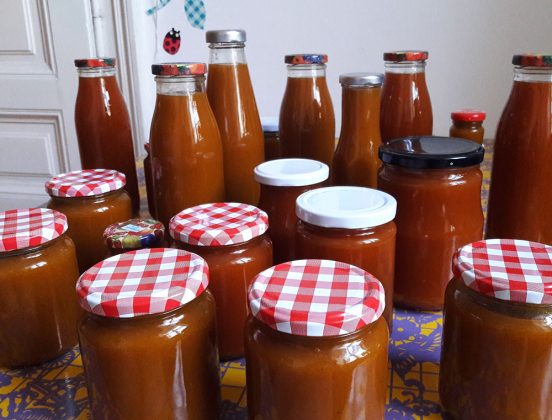
After.
Somewhere, there is a garden. The people owning the garden are nice people, so they deliver fresh produce to their offspring and other people they like. And that’s how we ended up with a monstrosity of a pumpkin sitting on our kitchen floor.
And of course we needed to know how much usable flesh it had to do anything with it, and that is determined by monster-pumpkin’s weight and size. It had already been decided that pumpkin ketchup was wanted, so knowing how much output there would be, and precisely how much vinegar to shop for suddenly became a major concern of everyone involved – which at this point had begun to include everyone in the apartment.
That led us to doing the only reasonable thing: we put the pumpkin on the kitchen scale (or tried to): The pumpkin was so big that it obscured the display of the scale. When we did manage to read it we got an error because it was so heavy.
What any sensible, normal home preserver would do at this point is just cut up the pumpkin and weigh the flesh in batches. However, we started our pumpkin ketchup planning at the very reasonable time of midnight, and didn’t really want to actually chop and store (or cook) a whole pumpkin right then and there.
This left us a handful of possibilities, starting from unreasonable and ending up at downright silly. We jumped right in: being a household of sewists, the obvious first action was to take the pumpkins’ measurements and calculate its volume.
The more visually inclined residents estimated that the pumpkin was fairly close to an ellipsoid in shape, and to calculate its volume that way requires only three measurements – the radial lengths in each of its dimensions (that is the distance from the middle of the pumpkin to the outer edges).

Ellipsoid with axes labeled, © ag2gaeh
The measurements needed are the lengths of the labels a,b and c. One can then find the volume of the ellipsoid by putting those values into the formula:

The volume of an ellipsoid.
After extensively measuring the pumpkin in all three of its dimensions*, it was decided that
- a = 16.5 cm
- b = 14.5 cm
- c is between 7.5 and 8 cm
As it turns out measuring a pumpkin accurately with a tape measure is more difficult than it looks. It takes some guesswork expertise to deal with all the bumps and ridges, and also to calculate the volume of the hole in the middle of the pumpkin.
This gave us a range of volumes for the entire pumpkin using the formula above. It came out between 7.516L and 8.018L.
To turn a volume measurement into a weight measurement involves knowing the density of whatever it is you’re measuring. So we did a quick search on the internet and it was suggested that pumpkin has roughly the density of water. Since a litre of water weighs one kilogram** we were done by changing the litres to kilograms on our values above.
Now we could move onto much more important things like finding a recipe to adapt and crib from. Or starting our shopping list*** with an appropriate amount of vinegar and other spices (for making curry ketchup, which was something that everyone agreed would be by far the best thing on fries), right?
By this point we were curious about this pumpkin and decided to figure out if the pumpkin flesh really has the density of water, and if estimates for the weight obtained by measuring and guessing and modelling with shapes were accurate, too (read: it was a matter of pride, by this time. And stubbornness. Mostly stubbornness.). So being scientists and nerds, we put the pumpkin aside with the plan to do some more basic science to see if the measurements were close and if we could figure more out about it****.
In the morning, we started by finding the biggest bucket we could, but we already knew we had a problem as the pumpkin wasn’t exactly small. We eventually settled on dropping the pumpkin into a laundry basket containing about 20L of water.
By estimating the volume of the pumpkin more closely and seeing how much water it displaced, we worked out an estimate for the density of the pumpkin flesh. In all of this, for the science-y minded people, we were invoking Archimedes’ principle, which boils down here to saying that the weight of the pumpkin is equal to the density of the pumpkin multiplied by the volume of water it displaces. Applying this would let us roughly figure out how much future pumpkins would weigh based on only their volume.
Note that by this point, with the pumpkin floating in a laundry bucket of cold water, we were way past what would be reasonable just to preserve the pumpkin to eat — instead we decided to immortalize it, and understand literally everything we could about its composition, because doing science in addition to cooking just felt completely necessary here.
All that in mind, we submerged the pumpkin before we cut it up. This was a lot of effort, and it felt like trying to drown a brick-like sponge. After wrestling with it for a while we found that it displaced 12.5L of water.

Floating pumpkin.
Note that it’s floating. Using this clue and our Holmesian powers of abduction we remembered that pumpkins have a large hole of seeds and air in the centre, which lowers the average density so much that it floats. Thus, to figure out specifically how dense the flesh is relative to water we had to give in and sink it.
We cut the pumpkin in half and filled up each half. We found that the total amount of water we could pour inside was 2.75L with the seeds inside, and 4.71L without the seeds – thus the seeds had a volume of 4.71L-2.75L = 1.96L.
Subtracting this volume of water from the water displaced we get the total volume of displaced water for the flesh alone: 7.79L. This showed us that with all this extra work, that the professionally measured volume (read: tape measure supported guess) was actually close for the flesh volume. If we were to do it again, only measuring the volume would entirely reasonable.
Note that if we stopped here and just assumed that water and pumpkin flesh had the same density, we would have obtained a weight estimate of 7.79kg.
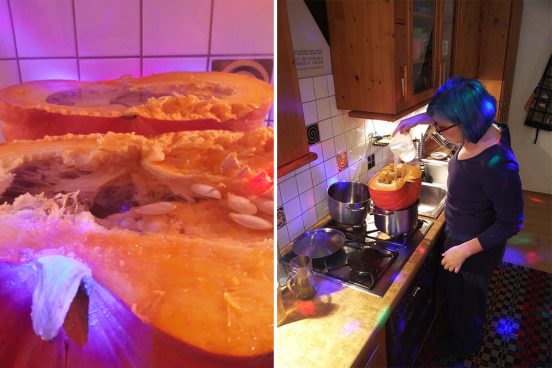
Yes. Our kitchen is, in fact, lit by a disco bulb.
We then cut up and weighed the flesh on the kitchen scale. Each half was close in weight and the total weight of the pumpkin flesh was 6.616kg. We also weighed the gooey seeds, which came to 865g — so the total weight of everything was 7.481kg.
This means our estimates assuming that the density of pumpkin flesh is the same as the density of water were only out by somewhere in the range of 35 to 537 grams. However, the fact that the weight of the flesh is quite different from the volume measurements tells us that the density assumption isn’t really a valid one in the first place.
It’s also important when doing complex measurements this way to keep track of everything on a large piece of scrap paper – we chose a handily oversized engineers pizza box from dinner the night before for this job.
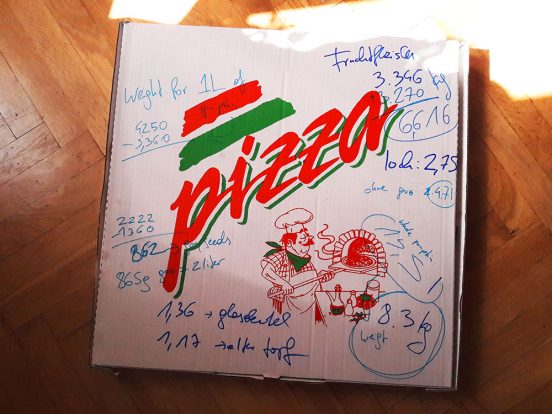
Our lovely pizza box. It’s family pizza sized.
And armed with that weights of the flesh and goo, we proceeded to figure out their densities by Archimedes’ principle. The density of pumpkin is 6.616kg/7.79L, which is approximately 0.849kg/L, and the density of the goo is 0.865kg/1.96L, which is approximately 0.444kg/L. All this came from the formulae:
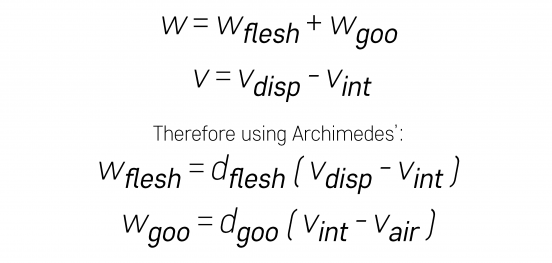
Equations for relating the density and the volume to the weight.
- where here w is the weight of the pumpkin
- w(flesh) is the weight of the pumpkin flesh (here 6.616kg)
- w(goo) is the weight of the pumpkin seeds and goo (here 0.865kg)
- v is the volume of the pumpkin
- v(disp) is the amount of water it displaces in a container (here 12.5L)
- v(int) is the internal volume of the pumpkin, i.e the volume inside the pumpkin without the seeds (here 4.71L)
- v(air) is the internal volume of the pumpkin with the seeds left inside (here 2.75L, this is obtained by putting water inside the pumpkin BEFORE scooping out the seeds)
To recap, from this we found that d(flesh), the density of the flesh, is approximately 0.849 kg/L and d(goo), the density of the goo, is approximately 0.444 kg/L. From this calculation we can see the density of the flesh differs from that of water.
This can also be used to estimate the weight of either flesh or goo for a generic pumpkin (or estimate it) simply by knowing the overall volume, i.e the volume displaced in a bucket minus the volume of the insides without the seeds (or the difference between the internal volume and the volume with the seeds in, as above.). The following handy formulae work for that:

Density for the various pumpkin parts.
This won’t give perfectly accurate results for any other pumpkin, as they’re specific to this one specimen. But it will give a rough estimate*****.
After a few extra hours we had an almost comprehensive understanding of the pumpkin: how it looked, was shaped, its weight and how dense its goo was. From all that it turns out just measuring everything will give you a good idea of how the recipes below scale. However, if you’ve got some free time and like playing with your food, then you could probably squash all of this into an afternoon.
Recipe
The point of this whole post is sharing the pumpkin ketchup recipes, so here is what we came up with. It works great for winter gifts that are more interesting than chutney or jam. Or just eat all of it yourself … I really love the curry ketchup on fries, with obscene amounts of mayonnaise.
These are the scaled recipes, each starting from a base of 1kg of pumpkin, and they require jars or bottles to seal the ketchup in once its complete.
|
Plain Ketchup |
| 1kg |
pumpkin (prepared) |
| 350ml |
apple cider vinegar |
| 1/2 tsp |
salt |
| 1/2 tsp |
pepper |
| 1/2 tsp |
citric acid powder |
| 1 pinch |
caraway(kümmel) (or to taste) |
| 1 pinch |
cumin (kreuzk.) (or to taste) |
| 65g |
tomato puree |
| 450g |
jam sugar |
|
Curry Ketchup |
| 1kg |
pumpkin (prepared) |
| 400ml |
apple cider vinegar |
| 80g |
onion |
| 1/2 tsp |
salt |
| 1/4 tsp |
pepper |
| 1/2 tsp |
citric acid powder |
| 10g |
curry powder |
| 15g |
tomato puree |
| 450g |
2:1 jam sugar |
Note that this is one recipe for both the curry ketchup and the plain one. You can pick either one and just follow the respective recipe – or make both! The recipe is perfect for experiments, too.
You can experiment with the amount of vinegar and spices, adapting the recipe to your own preferences. And sometimes the ingredients can make a huge difference too: We made the curry ketchup again after a while, using a different sort of pumpkin and a new brand of curry powder and needed almost twice as much curry to get a similar taste.
Peel, deseed and coarsely chop the pumpkin, and dice the onion. This step really only takes 15 minutes and not the 3 hours suggested by the first part of the story.
Place the pumpkin flesh in a large pot and add half the vinegar and onion (if used). Cook everything on medium heat until it‘s soft and mushy, then puree the mixture until you‘ve reached a consistency you like for your ketchup. You want to loose as much water as you can at this stage, so cook it with an open lid.
Add the spices, tomato puree and the rest of the vinegar (You might want to adjust the amount of vinegar in this step) and cook for 30 minutes or until mixture has reached a ketchup-like consistency. Your pumpkin might need to loose considerable amounts of water: We ended up with roughly one liter of pumpkin ketchup per kilo of pumpkin in the recipe. Be careful: The mixture burns easily, and the bubbling sugary pumpkin mush is really really hot. We found it easiest to bring it to a temperature where the mixture is not yet simmering, just steaming. Then we just kept stirring it occasionally until it was thick enough.
Add the jam sugar (Gelierzucker) and boil for 5-10 minutes or according to the directions on the package. Again, be careful because it will do it’s best to burn to the bottom of the pan.
Transfer into sterilized jars or bottles, sealing them quickly as you go.
Note
The measurements in the recipe are what worked for me.
I always prefer adding the vinegar in stages – and tasting
the mixture between additions to make sure it tastes good.

The End.
You know what the best part is?
After floating the pumpkin and calculating its density, we went on to actually cook the ketchup. Only to find we were not equipped to deal with such volumes of pumpkin flesh****** as we only had enough pots to make 6L of ketchup …
Footnotes *******
* Taking time as a dimension though, this pumpkin is really really huge.
** It’s basically a conversion unit, though it does change if the temperature/pressure of the ambient space differs extremely from what is reasonable – another way to get to this is to take water as the basic mechanism for measuring density (which seemed reasonable to Archimedes) and so we would want to normalise to water, somehow.
*** We never did figure out how many bottles of vinegar to buy, so we just got 4L. If you have a quick look at the recipes, you can see that this turned out to be way to much.
**** At some point during this process (way after the measuring process went from purely practical to WHAT ELSE CAN WE LEARN ABOUT THIS PUMPKIN AND WHAT IS THE MOST INTERESTING WAY TO ACHIEVE IT???) we actually found a luggage scale and rigged a sling to get a weight. Our measurement of the weight using that scale was 8.3kg, which isn’t too far away from accurate – if you don’t want to get wet, don’t own a tape measure or just want ketchup).
***** If anyone else tries this process, please do send the numbers you obtain over. We can do a real study to get better estimates.
****** If a pumpkin is too big for average kitchen scales, chances are it’s too much for any given cooking project. Ahem.
******* Because all the best recipes require footnotes.


